

Eggs O’Plenty recipes
What to do when you have too many eggs or too many chickens who produce too many eggs? There is always the house of your most annoying acquaintance, but then, there are much more productive ways to use your eggs. So if you find yourself asking the question, “What can I do with all these eggs?”, following are some suggestions - both sweet and savory! In fact, there are 8 recipes that insist on lots of eggs, all easy and all delicious, including: Loaded Deviled Eggs, Popovers with Gruyere Cheese, German Pancakes, Loaded Creamed Eggs on Toast, Italian Carbonara, Velvet Chocolate Mousse, Spanish Omelette and Berry Meringue Roulade. Time to get cracking!
Loaded Deviled Eggs

A universally popular appetizer and something to make when you have too many eggs on hand. Taken to another level with the addition of ham and chives, who can resist popping one in their mouth!
loaded deviled eggs
6 large eggs
1/3 cup mayonnaise
1 tablespoon butter softened to room temperature
1 teaspoon dijon mustard
1 teaspoon wine vinegar
1 teaspoon garlic powder
pinch of salt
1/2 teaspoon pepper
1/3 cup ham, finely diced
3 tablespoons finely chopped chives or the green ends of scallions
lemon and pepper seasoning
Hard Boil Eggs
-Place eggs in a large saucepan and cover with water. Transfer to stove top over high heat until water begins to boil.
-Boil for one minute, cover with lid, and remove from heat. Allow to sit for 15 minutes and then drain and transfer to an ice bath. (Crack each egg slightly before placing in ice water if you plan to peel them later. This will make them easier to peel.)
-Peel eggs and set aside.
Create Deviled Eggs
-Peel the eggs then slice in half lengthwise. Gently remove yolks and place in a medium-sized bowl. Mash the yolks with the back of a fork or a potato masher until they form a dry paste.
-Add mayonnaise, mustard, butter, vinegar, garlic powder, salt, and pepper. (Add a dash of Tabasco sauce if you want some heat.) Stir well until smooth. Add ham and all but 1 tablespoon of the chives and mix in. Taste for seasoning adding more salt and pepper if needed.
-Spoon a large teaspoon full of filling into each egg white. Sprinkle with smoked paprika and lemon-pepper seasoning then garnish with the reserved minced chives. Chill until ready to serve. Makes 12

Hard boil then peel the eggs.

Cut the eggs in half and remove the yolks to a small mixing bowl and mash well. Finely dice chives or green onions and ham.

Stir all the remaining ingredients (except lemon-pepper seasoning and paprika) into the egg yolks and mix well.

Using a teaspoon, fill the cavity in each egg half generously with the yolk mixture.

Garnish eggs with smoked paprika, a sprinkle of lemon-pepper seasoning and minced chives.

Chill until ready to serve. Be sure to take at least one before you serve them - they disappear quickly!
Popovers with Gruyere Cheese

So airy and light, popovers are as fun to make as they are to eat! The easy, eggy batter pops to 3 times the batter’s original height as they bake. Topped with Gruyere cheese for just a touch of elegance, they are a delightfully, crunchy bread accompaniment to any meal.
Popovers with Gruyere Cheese
4 large eggs
1 cup, plus 1 tablespoon all-purpose flour
3/4 cup whole milk
2 tablespoons water
1/2 teaspoon salt
3 tablespoons vegetable oil
3 tablespoons butter
1 tablespoons dried chives
3/4 cups grated Gruyere cheese
-Combine eggs, milk, water, flour and salt in a medium bowl and whisk until a very smooth batter is formed (or place in a blender or food processor and run until a very smooth better is formed) about 2 minutes. Stir dried chives into the batter then set batter aside to rest at room temperature for at least 30 minutes up to 3 hours before using. (To develop the best flavor, pour batter into an airtight container and chill overnight.)
-Preheat oven to 450 degrees. Melt butter and combine with oil. Distributing evenly, pour butter/oil mixture into the wells of a 6-well popover or muffin tin, or a 12-well standard muffin tin. Place the baking tin in the hot oven until the oil and butter are very hot, about 7 - 8 minutes.
-Remove hot tin from oven and place on a non-burn surface. Quickly whip the batter mixture up again for about 1 minute either by hand with a whisk or in a blender or food processor. Pour batter into hot tins, distributing evenly between them, then sprinkle about 1 tablespoon grated cheese on top of the batter in each well.
-Place the tin back into the hot oven. Bake at 450 degrees for 15 minutes, then turn heat down to 400 degrees and bake for another 12-15 minutes. Do not open the oven while popovers are baking.
-Remove from oven and turn popovers out of the tin. Popovers should have tripled in size and become a deep brown all over, be crisp to the touch and sound hollow when tapped. Larger sized popovers should take about 30 minutes total cooking time. Regular sized muffin tin popovers should take 15-20 minutes, so adjust times accordingly.
-Serve immediately while still hot or cool and store in fridge for up to 3 days then reheat in a toaster oven or a regular oven set to 375 degrees, for 5 minutes. Makes 6 large popovers or 12 regular sized popovers.

Place oil and butter in each well of the baking tin and heat until very hot.

Pour the batter to half to 2/3rds of the way to the top into each cup of the baking tin.

Sprinkle grated Gruyere on the top of the batter in each muffin cup.

Bake popovers in very hot oven until they are puffed up, crunchy on the edges and light and airy. Popovers rise into irregular shapes and sizes with a well in the center when they are baked.

Butter isn’t necessary but it certainly can’t hurt as it melts into the popover!
German Pancake

So easy to make for breakfast or brunch, this puffy pancake is a simple crowd pleaser! Let them have it their way, with fruit, with syrups, with powdered sugar, with whipped cream or peanut butter!
German Pancake (Dutch Baby)
1 cup milk
5 whole eggs
1 cup all-purpose flour
dash salt
1 teaspoon vanilla extract
6 tablespoons butter
-Preheat oven to 425 degrees F.
-Cut butter into chunks and place in an ungreased 9 X 13 baking dish. Place in oven, just until the butter is melted.
-Combine milk, eggs, flours, salt and vanilla in a blender and process on high speed about 3 minutes until very smooth. Pour the batter immediately into the hot baking dish over the melted butter.
-Bake, for about 25 minutes, un edges are golden brown and puffy and pancake is set in the center.
-Serve immediately by cutting into squares. (Pancake will deflate as it sits, but it is still delicious served later when it has cooled down a bit.. To serve, sprinkle generously with powdered sugar and other toppings as desired. Suggested toppings: maple syrup, berry purees, apple pie filling, cherry pie filling with a dab of sour cream, etc.

Melt butter in a baking dish in the hot oven.

Pour the smooth batter right into the center of the hot baking dish.

Bake until the edges are browned and the pancake puffs up in different places in the center.

Serve right from the oven sprinkled with powdered sugar and with your toppings of choice. (Raspberry puree pictured above.)
Loaded Creamed Eggs on Toast

From humble Creamed Eggs on Toast to a “brunch stunner” with ham, potatoes, mushrooms and cheese served over grilled Italian rolls. Celebrate the egg by taking them to the next level!
Loaded Creamed Eggs on Toast
2 Italian or Hero rolls, sliced in half horizontally
3 tablespoons butter
1/4 cup plus 1 tablespoon flour
1 cup chicken stock (or 1 cup water and 1 teaspoon bouillon)
1 1/2 cups milk
1/2 cup sour cream
2 green onions, white and tops finely chopped
1 shallot, peeled and finely chopped
1 cup chopped ham
1/2 cup chopped mushrooms, sauted in 2 tablespoons butter until soft
4 hard boiled eggs, peeled and sliced
1 large potato, boiled until tender, peeled and diced
1 cup shredded or finely diced Swiss or Ementaler cheese
1 teaspoon coarsely ground pepper
salt to taste
paprika
chopped parsley for garnish
-Place eggs in a small saucepan and cover with water by about an inch. Bring water to the boil and continue to boil for one minute. Cover pot with lid and turn off the heat, then let sit for 10-12 minutes. With the edge of a fork or spoon, tap the shell of each egg until it cracks slightly (this helps them peel more easily later), then run cooled water over the eggs for about 2 minutes and set aside to cool in the water. After 15 minutes, drain the water off, peel the eggs, then slice the eggs horizontally, into thin slices.
-Meanwhile, in a medium saucepan, melt butter. Add shallot and saute for 2-3 minutes, until soft. Stir in flour and cook over medium heat, 1 - 2 minutes, stirring with whisk constantly. Stir in milk and mix with whisk. Add chicken stock and cook over medium heat stirring frequently, until mixture thickens and comes to a boil. Remove from heat. Allow to cool for about 10 minutes then stir in sour cream and green onions. Season with salt and pepper to taste.
-In a medium mixing bowl, combine ham, eggs, potato, mushrooms, cheese, parsley and pepper. Reserve 1 cup of the white sauce and set aside then pour the rest of the sauce over the ingredients in the bowl and mix gently just until most of the filling is covered with the white sauce. Taste for salt and pepper. Add more if needed, to taste.
-Split Italian rolls in half, horizontally and spread with 1 tablespoon butter on each half. Place under the broiler and broil until slightly browned. Remove from broiler and place on working surface.
-Spoon the filling evenly over the tops of the 4 pieces of the rolls. Arrange the sliced eggs on top, down the center of each half and pour the remaining white sauce over the hard boiled eggs. Dust the top of the eggs with paprika and garnish with chopped parsley.
-Serve immediately while still warm. Makes 4 servings.

Mound breakfast ingredients in white sauce on the tops of the grilled rolls.

Arrange the hard-boiled egg slices down the top of the filling on each roll, sprinkle with paprika and garnish with chopped parsley or green onions.
aUTHENTIC iTALIAN Carbonara

When in Rome, do Carbonara as the Romans do! It’s an easy and quick pasta dish with a velvety egg yolk sauce and Parmesan cheese. The bacon provides a smoky crunch and the garlic and black pepper just enough flavor to make you take notice. And when at home, still do Carbonara as the Romans do!
Authentic Italian Carbonara
6 oz thick bacon, slab bacon or pancetta
2 egg yolks
1/2 cup Parmesan or Parmigiano Reggiano cheese, finely shredded
1/4 teaspoon freshly grated black pepper
14 ounces dried spaghetti
2 teaspoons salt, for cooking liquid
1 tablespoon olive oil
1/2 cup pasta cooking water (reserved)
1 garlic clove, finely minced
3 tablespoons finely chopped parsley
Parmesan or Parmigiano reggiano cheese, finely shredded
Freshly grated black pepper
-Place the eggs and yolks in a large mixing bowl then whisk to combine. Stir in the pepper and Parmesan cheese.
-Place a large pot with 6 - 7 cups of water over high-heat on the stove, then bring to a boil with the salt and oil. Add pasta and cook per the packet directions. Just before draining, measure out 1/2 cup of pasta cooking water and set it aside, then drain the rest of the pasta.
--Cut the bacon across the strips 1/4 inch in width. (If using slab bacon, cut the bacon in small diced pieces). Add the bacon to a large saute pan and fry the bacon until completely cooked and browned. Add garlic for the last minute or so before the bacon is finished to soften it. Quickly add the hot pasta into the saute pan with the bacon and toss to coat it in the bacon fat.
-Immediately transfer the pasta and any remaining bacon fat in the pan into the bowl with the egg mixture. Add 1/2 cup of the reserved pasta cooking water. Stir vigorously using a wooden spoon for 1 minute until the sauce transforms from watery to creamy and clings to the pasta strands
-Serve immediately by transferring to warm individual serving bowls then garnish with a little extra cheese, if desired, a grind of fresh black pepper and finely chopped parsley. Makes 4 - 5 servings. Serve with a light salad and a crunchy Italian loaf.

Cook the pasta until just tender then toss in the egg yolk, Parmesan and cooking water mixture until strands of pasta are well coated.

Cook the bacon until crisp and crumbly.

Place pasta and sauce into an open bowl and garnish with bacon bits, parsley and a sprinkle more of black pepper.

Serve immediately with extra Parmesan on the side.
PERSNICKETY NOTES:
1. Guanciale is the cured pork traditionally used in carbonara. Sold in block form that you cut yourself, it can be found in Italian/speciality delis and some butchers. It’s very fatty and has a stronger flavor than pancetta and bacon. Substitute with slab bacon or pancetta (so you can cut batons), or thick pre-sliced bacon. Must use streaky bacon as the sauce needs fat to thicken.
2. Use large or extra large eggs. Save the leftover egg whites for another use.
3. Parmigiano reggiano is a premium aged type of parmesan. Pecorino is also commonly used. You can substitute regular Parmesan cheese but do not use pre-grated cheese as it will not melt properly. For best results buy a block of cheese and shred it yourself.
4. Leftovers will keep for 3 days but pasta really is always best eaten freshly made.
Spanish Omelette (Chorizo & cheese Tortilla)

One man’s tortilla is another man’s omelette and visa versa! What’s in a name anyway. This Spanish Tortilla (not Mexican) is loaded with the wonderful flavors of Chorizo sausage and Manchego cheese and studded with onions and red pepper. An easy variation of a traditional omelette but with more spice, for breakfast or brunch!
Spanish Omelette (Chorizo & Cheese Tortilla)
2 small potatoes
4 tablespoons olive oil
1 small onion, chopped
1 red bell pepper, seeded and chopped
2 tomatoes, diced
6 ounces chorizo sausage, finely chopped
8 large eggs
2 tablespoons heavy cream
4 ounces manchego or parmesan cheese, grated
salt and pepper to taste
2 tablespoons minced flat-leaf parsley
-Cook the potatoes in a small saucepan of lightly salted boiling water for 15-20 minutes, or until just tender. Drain and let stand until cool enough to handle, then peel and dice.
-Heat the olive oil in a large skillet that can safely be placed under the broiler. Add the onion, bell pepepr, garlic and tomatoes and cook over low heat, stirring occaisonally for 5 minutes. Add the diced potatoes and chorizo and cook for an addition 5 minutes, until the chorizo is lightly browned. Meanwhile, preheat the broiler to high.
-Beat the eggs with the cream and salt and pepper to taste in a large bowl. Pour the mixture into the skillet and cook for 8-10 minutes or until the underside is set. Lift the edges of the tortilla occasionally to let the uncooked egg run underneath.
-Sprinkle the grated cheese over the tortilla and place under the hot broiler in the middle of the oven for for 10 - 15 minutes or until the top is set and the cheese has melted. Garnish with minced parsley. Serve warm or cold cut into thin wedges. Makes 6 - 8 servings.

Assemble the ingredients, do a bit of chopping and shredding and you are ready to cook!

Saute the onions, tomatoes and chorizo until the meat is cooked through and the vegetables are softened.

As the tortilla cooks in the skillet, lift the edges and allow uncooked egg to run underneath the part that is cooked.

Sprinkle cheese on top and place under the broiler about 15 minutes, until the tortilla is cooked through.

Turn the cooked omelette (tortilla) out of the pan, let rest about 5 minutes then garnish with parsley.

Cut into thin wedges and serve either warm or at room temperature. Serve with a green salad, crusty bread, aioli, or marinated olives for a complete meal.
Velvet Chocolate Mousse

Velvety in texture with a deep, rich chocolate flavor, this mousse is easily prepared and ready to serve in just over an hour. A perfect Valentine treat that evokes love at every bite. And who doesn’t love a beautiful mousse!
Velvet Chocolate Mousse
9 eggs separated
2/3 cup sugar
6 ounces semi-sweet chocolate bar or 3/4 cup semi-sweet chocolate chips
6 ounces 60% or 72% dark chocolate bar, depending on taste
1 cup whipping cream
1 tablespoon vanilla extract
pinch of salt
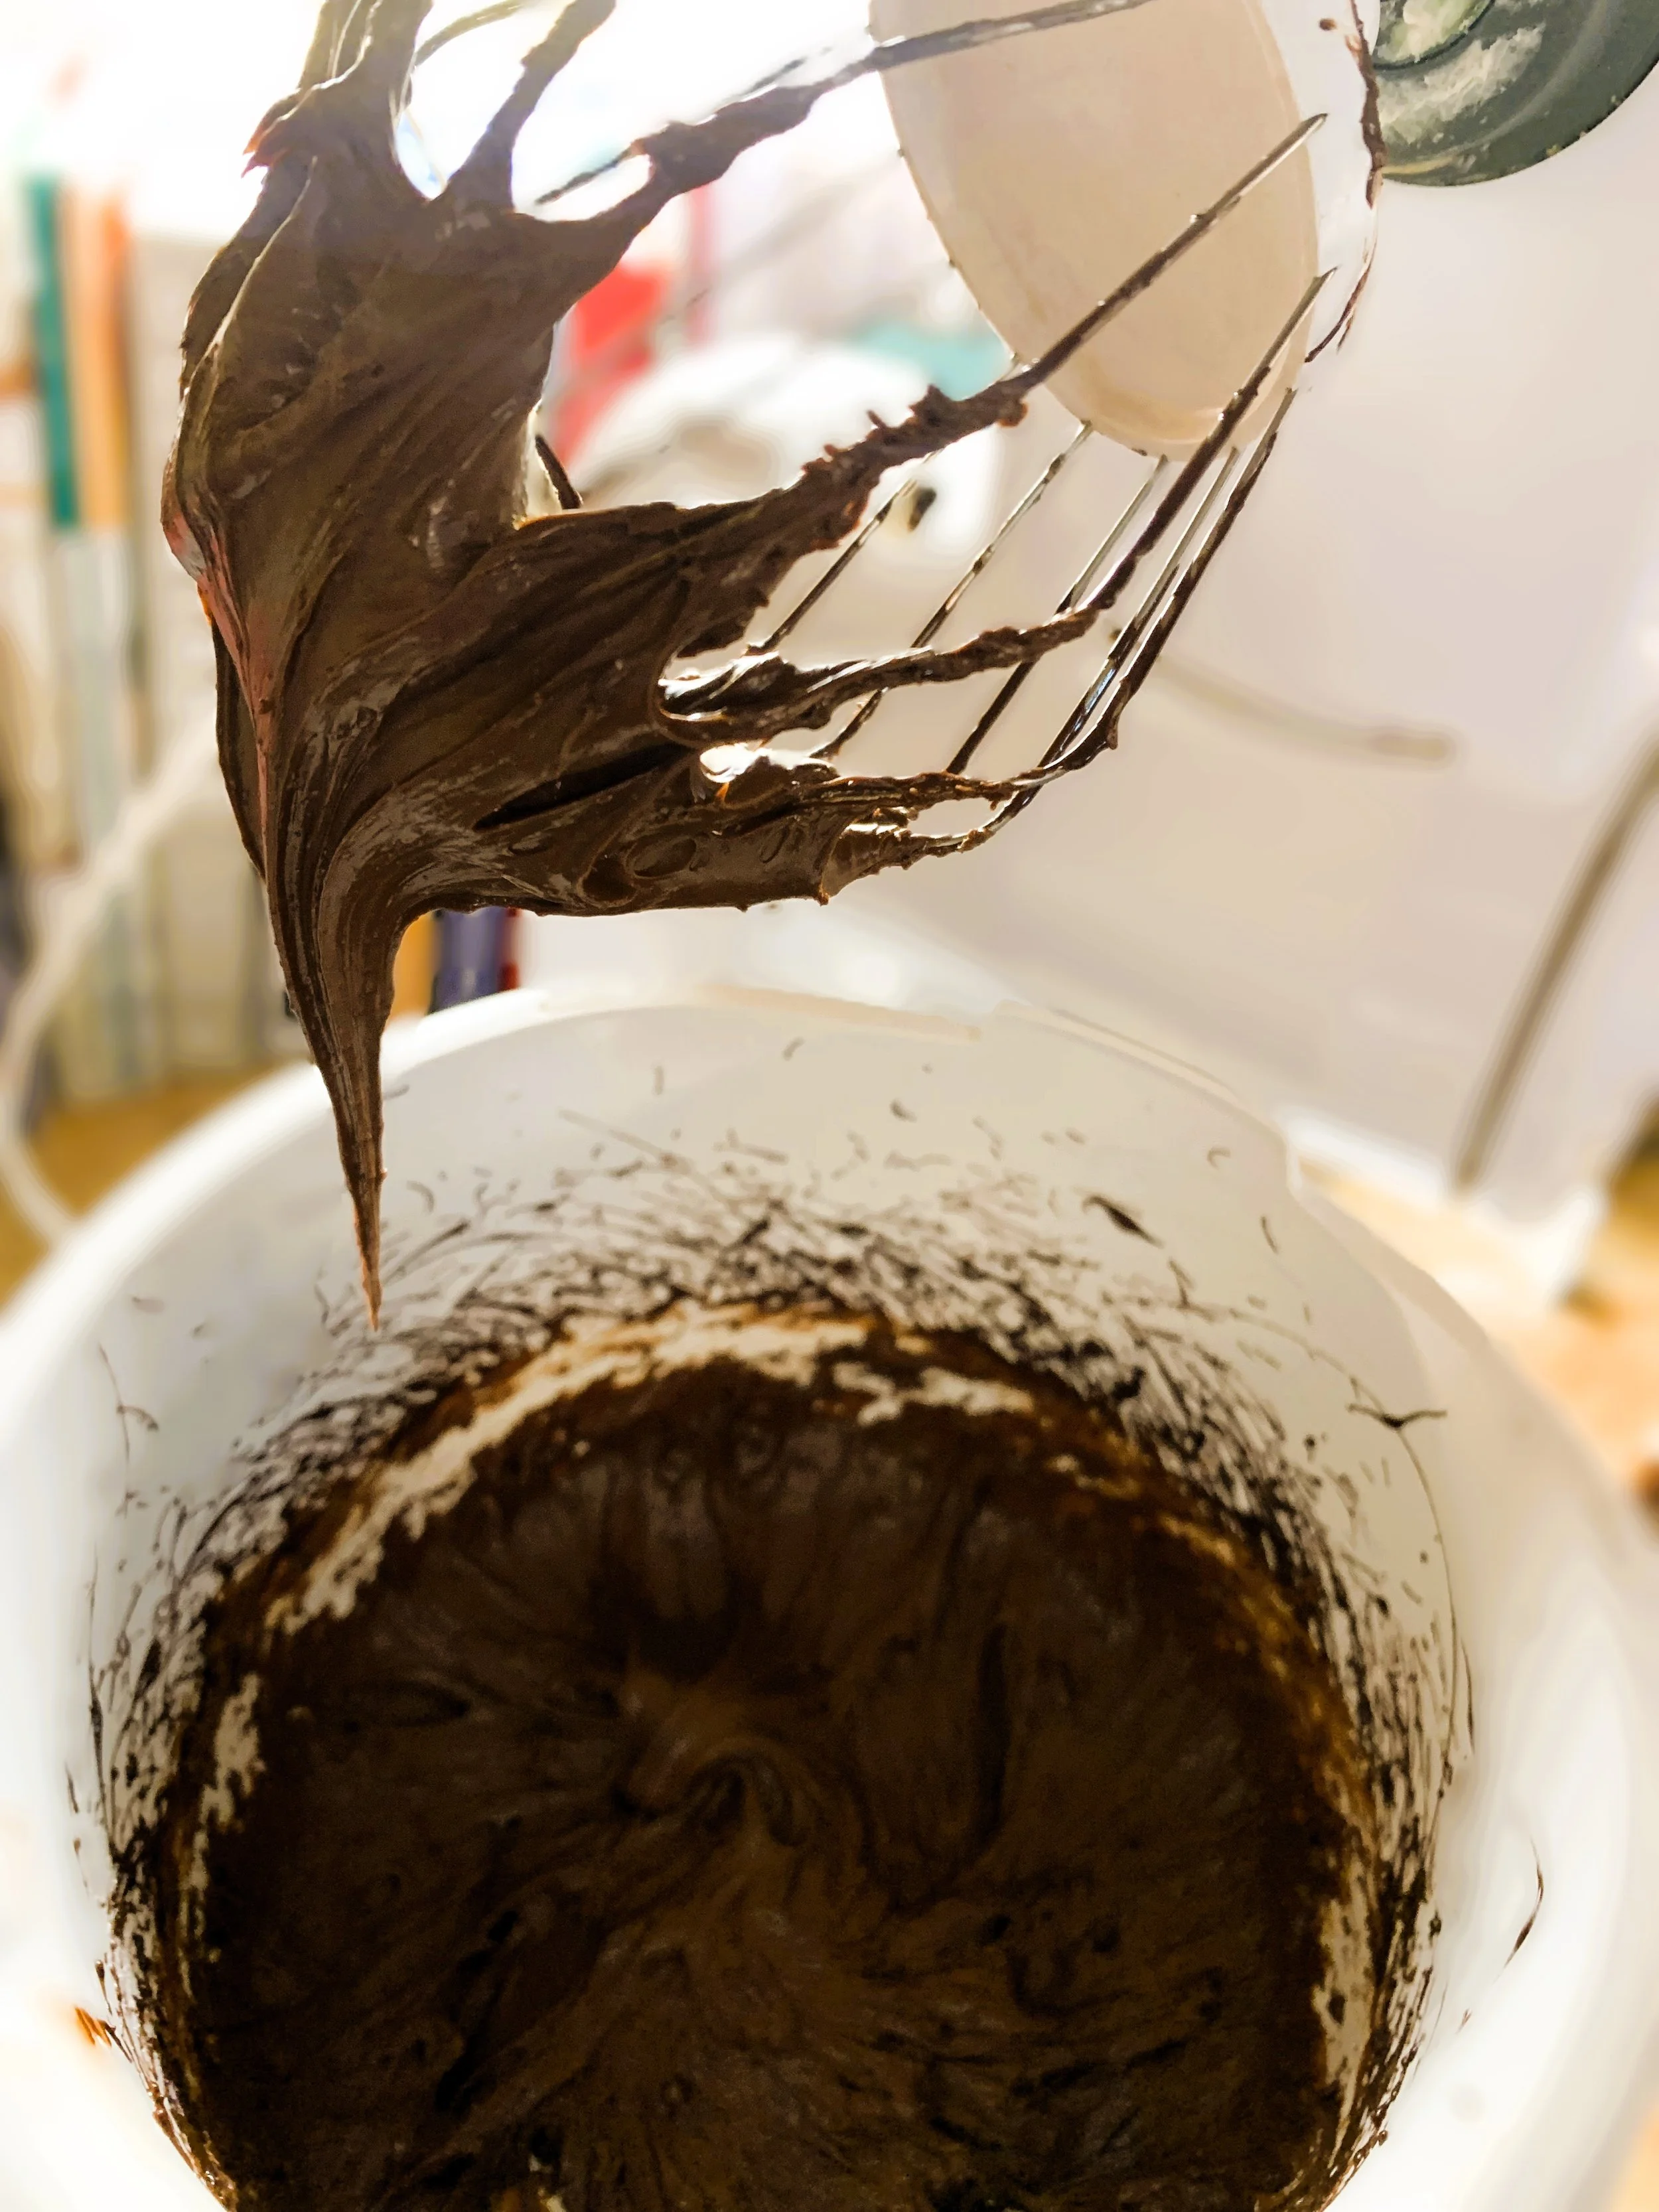
- In a medium mixing bowl cream yolks with sugar, with wire whip on high speed, until thick and yellow, about 5 minutes.
-Break up chocolate bars then melt either in microwave at 30 second intervals, stirring after, repeating 1 or 2 more times until all chocolate is melted and smooth after stirring. Set aside to cool for about 10 minutes.
-As egg yolk mixture is beating, slowly add chocolate along with 1 tablespoon vanilla extract. Then scrape chocolate mixture into a medium mixing bowl and set aside.
-Whip the cream to soft peaks, then add to the mousse mixture and fold in carefully until just a few streaks of white remain.
-In a separate clean and dry mixing bowl, beat the egg whites until very stiff. With a spatula, spoon egg whites on top of the chocolate mixture. Add the salt, then slowly and gently, fold the egg whites into the chocolate mixture until mostly combined.
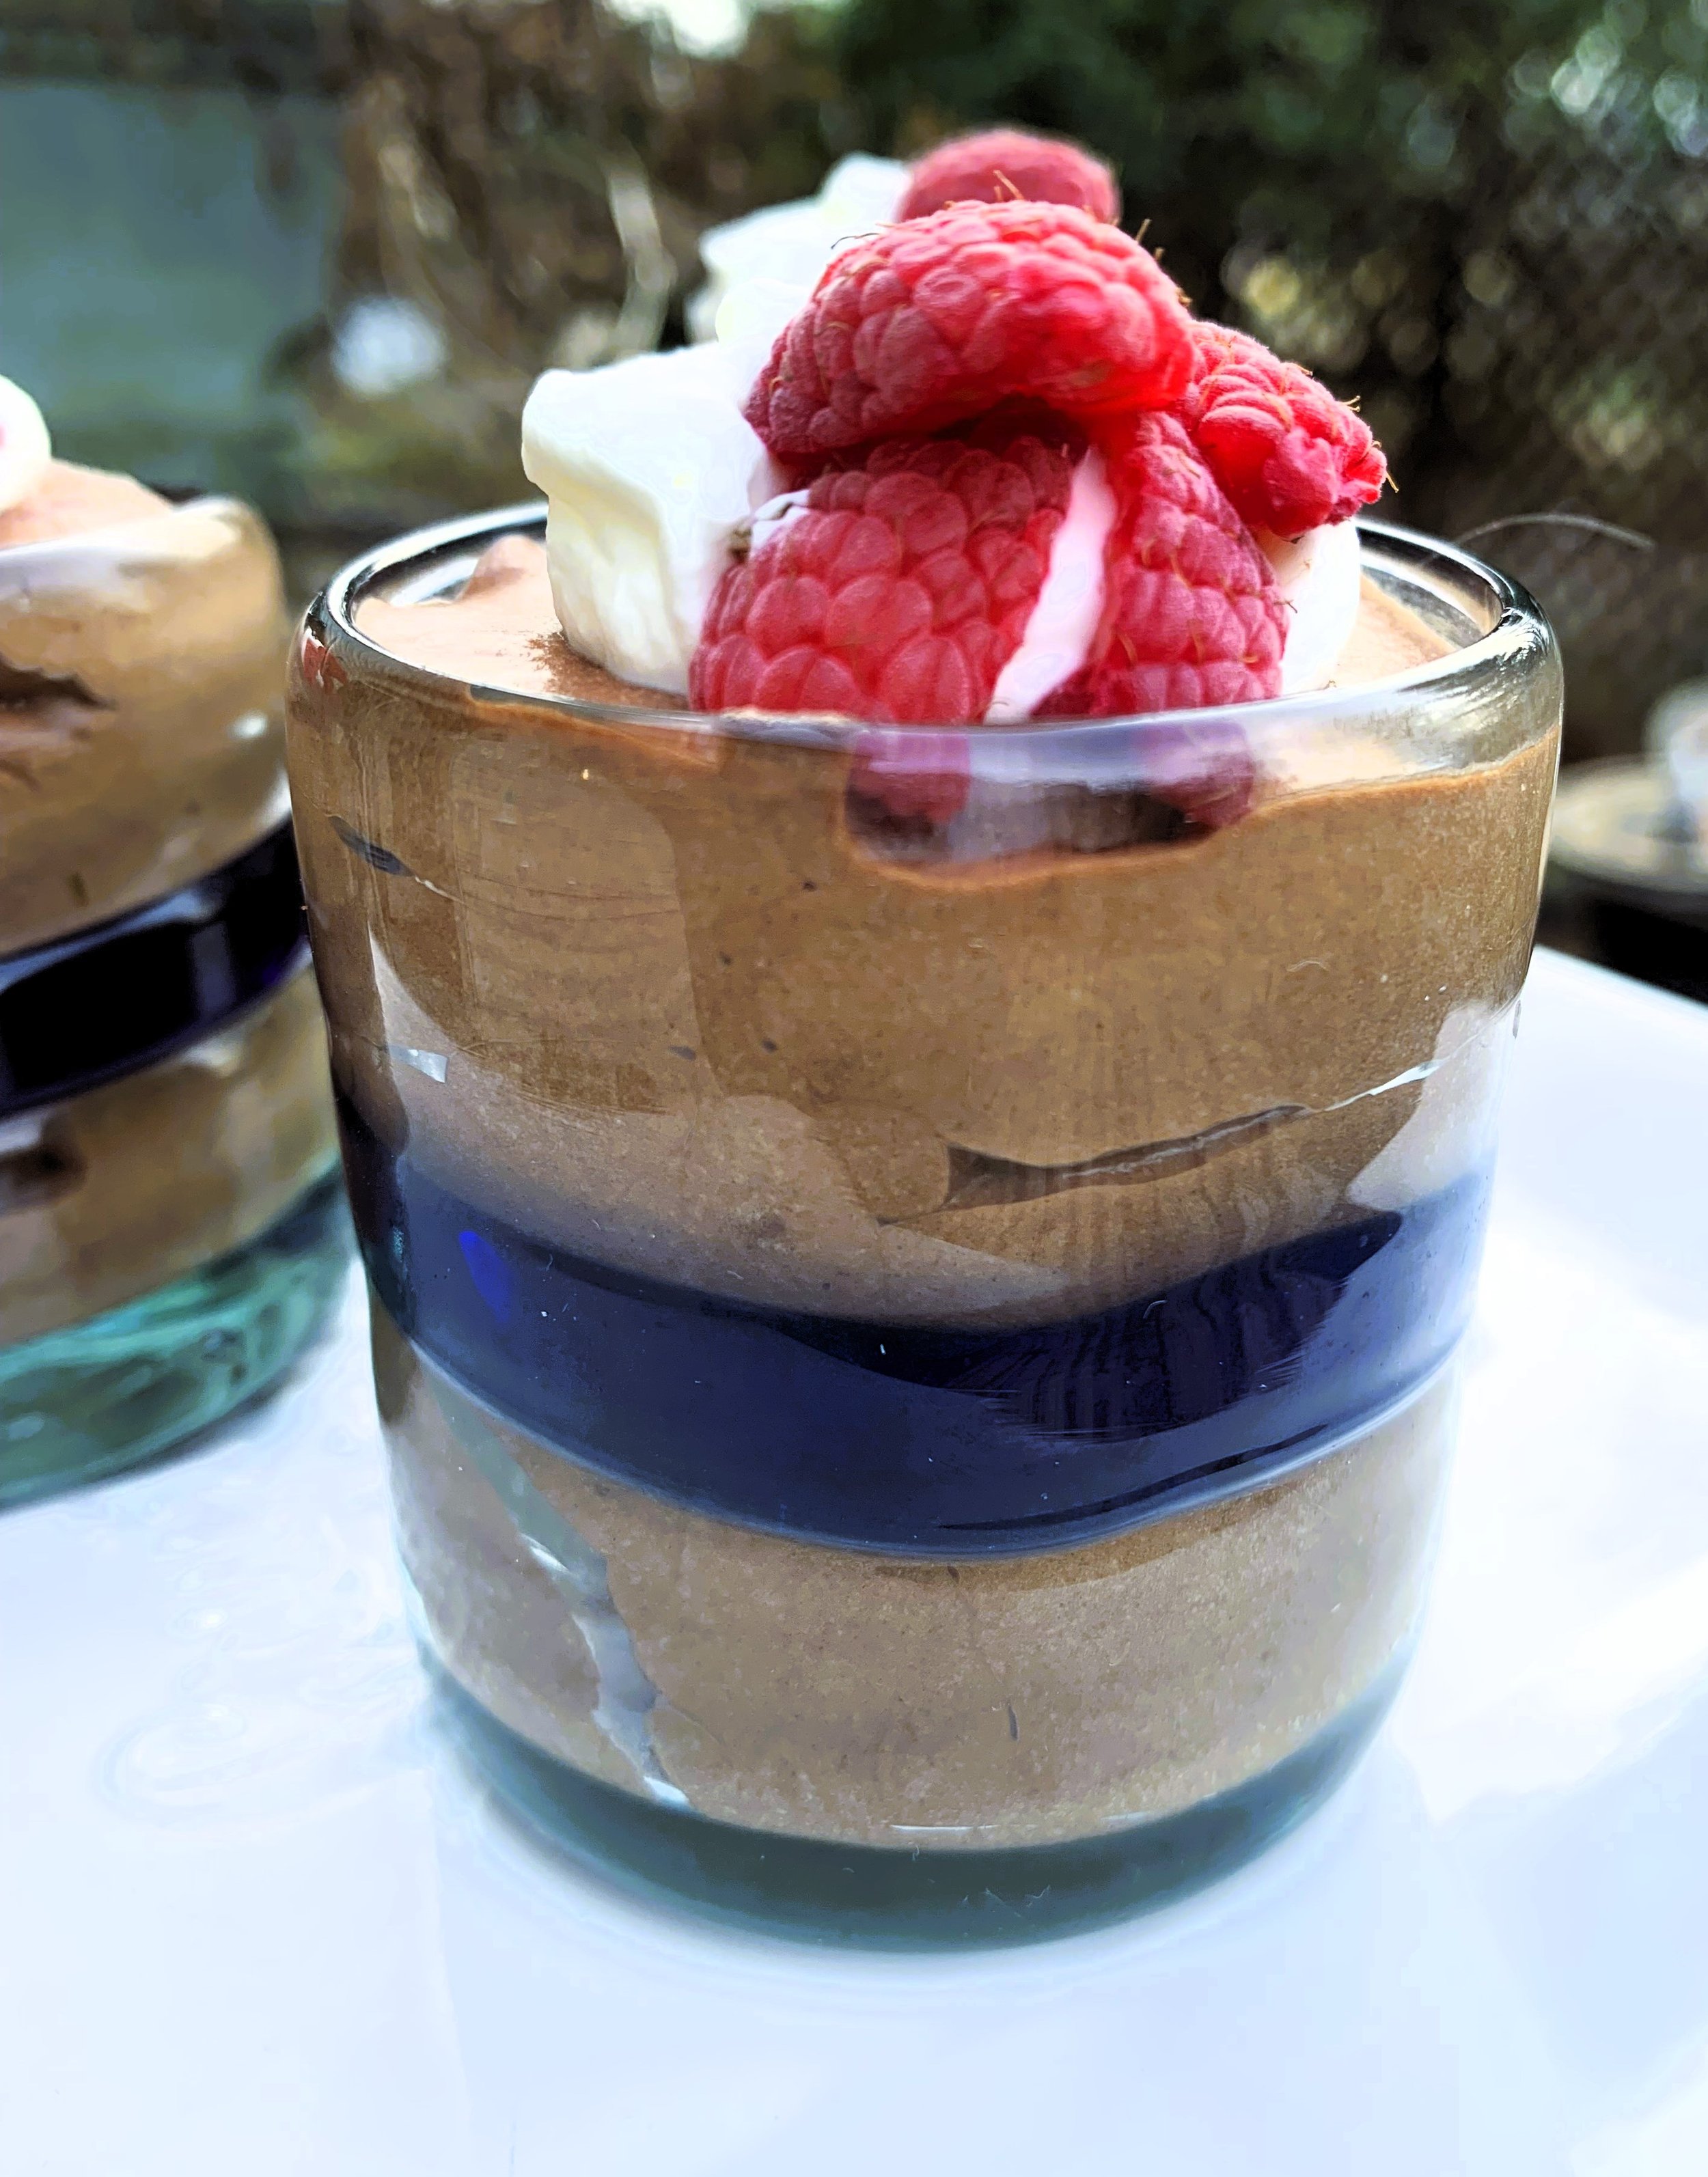
-Spoon the mousse into individual serving cups or ramekins, about 3/4 cups per serving or into one large glass dish. Chill for at least 1 hour before serving. Garnish with fresh berries and a bit of sweetened whipped cream, if desired. (The mousse will thicken as it chills.) Makes 6-8 servings.
Beat egg yolks and sugar until thick and lemon colored then mix in the melted chocolate.

Gently mix in whipped cream and then beaten egg whites until just a few streaks of white remain.

Gently fold the egg whites, then the whipped cream into the chocolate mixture.
Spoon mousse into individual bowls or ramekins or spoon it all into one large glass serving bowl.

Garnish with a bit of sweetened whipped cream and fresh berries.

Chill until ready to serve.
PERSNICKETY NOTES:
**This mousse is thinner than some varieties, but beautifully deep and rich in flavor. It is a good choice for using in other dessert recipes. For example, to fill pate choux puffs, as a mousse layer in a cake, in a trifle, or a mousse cheesecake. However, because this recipe is l-Whip the cream to soft peaks, then add to the mousse mixture and once again fold in carefully until just a few streaks of white remain.ooser than some, I don’t recommend it as the mousse used in a mousse cake or in a dessert where it needs to be thicker. It is best to use in a recipe that is served in a container, rather than as a free standing mousse.
**Adjust the chocolate to your taste, using a darker or lighter chocolate according to your taste. The percentage number (for example 72%) indicates that percentage of the product is made from the cocoa bean, therefore it is a darker chocolate than say 60%.
Berry Meringue Roulade

Very Berry and Very Delicious airy meringue roll filled with fresh berries and a slightly tangy whipped cream. An easy, impressive dessert!
Very berry meringue roulade
5 egg whites, at room temperature
1 cup granulated sugar
1/3 cup toasted shelled and roasted pistachios or sliced almonds
1 teaspoon vanilla extract
powdered sugar for dusting
FOR THE BERRY FILLING:
1 cup heavy or whipping cream, whipped in electric mixer until thick.
2/3 cup plain Greek yogurt
1/3 cup granulated sugar
1 teaspoon vanilla extract
1/2 cup fresh strawberries sliced
1/2 cup fresh blueberries
1/2 fresh blackberries
-Lightly oil a 9 X 13-inch baking pan with a raised edge and line with a sheet of parchment paper.
-Whisk the egg whites with an electric mixer until stiff but not dry. Add the sugar, 1 tablespoon at a time, and continue to whisk, until all the sugar has been incorporated and the mixture comes to peaks which are stiff and glossy.
-Spoon the meringue onto the lined baking sheet and spread with a spatula to level the surface. Sprinkle the toasted nuts evenly over the top.
-Bake near the top of a preheated oven at 385 degrees for about 8 minutes until the top is golden brown.
-Reduce the oven temperature to 320 degrees and continue baking for 10 minutes or until the meringue is firm to the touch.
-Remove the meringue from the oven and immediately invert it onto another sheet of parchment paper. Peel the lining paper from the base and leave the meringue to cool for 15 minutes.
-Mix the pre-washed and dried berries together. Whip the cream until thickened, adding sugar just as the cream thickens then stir in yogurt and vanilla extract. Spread the whipped cream evenly over the meringue, to within an inch of each edge. Spread the berries over the top of the cream layer.
-Roll up the meringue from one long side, using the parchment paper to help lift it up and over the berry filling using just enough pressure to wrap it somewhat tightly. Wrap the entire roulade in parchment paper or waxed paper and leave to chill in the refrigerator for about 30 minutes. Lightly dust with sifted powdered sugar before serving. Slice into about 1 1/2 inch slices. Serves (Recipe inspired by Mary Berry’s Strawberry Meringue Roulade)

Spread the meringue over parchment lined paper and scatter nuts over the top.

Turn the baked meringue out onto a piece of parchment paper.

Spread the cream/yogurt mixture over the cooled meringue then scatter berries over the top of the cream layer.

Roll the meringue up and over the berries and cream filling gently but firmly.

Dust meringue roll with powdered sugar and slice chilled roulade into 1 1/2 inch slices.
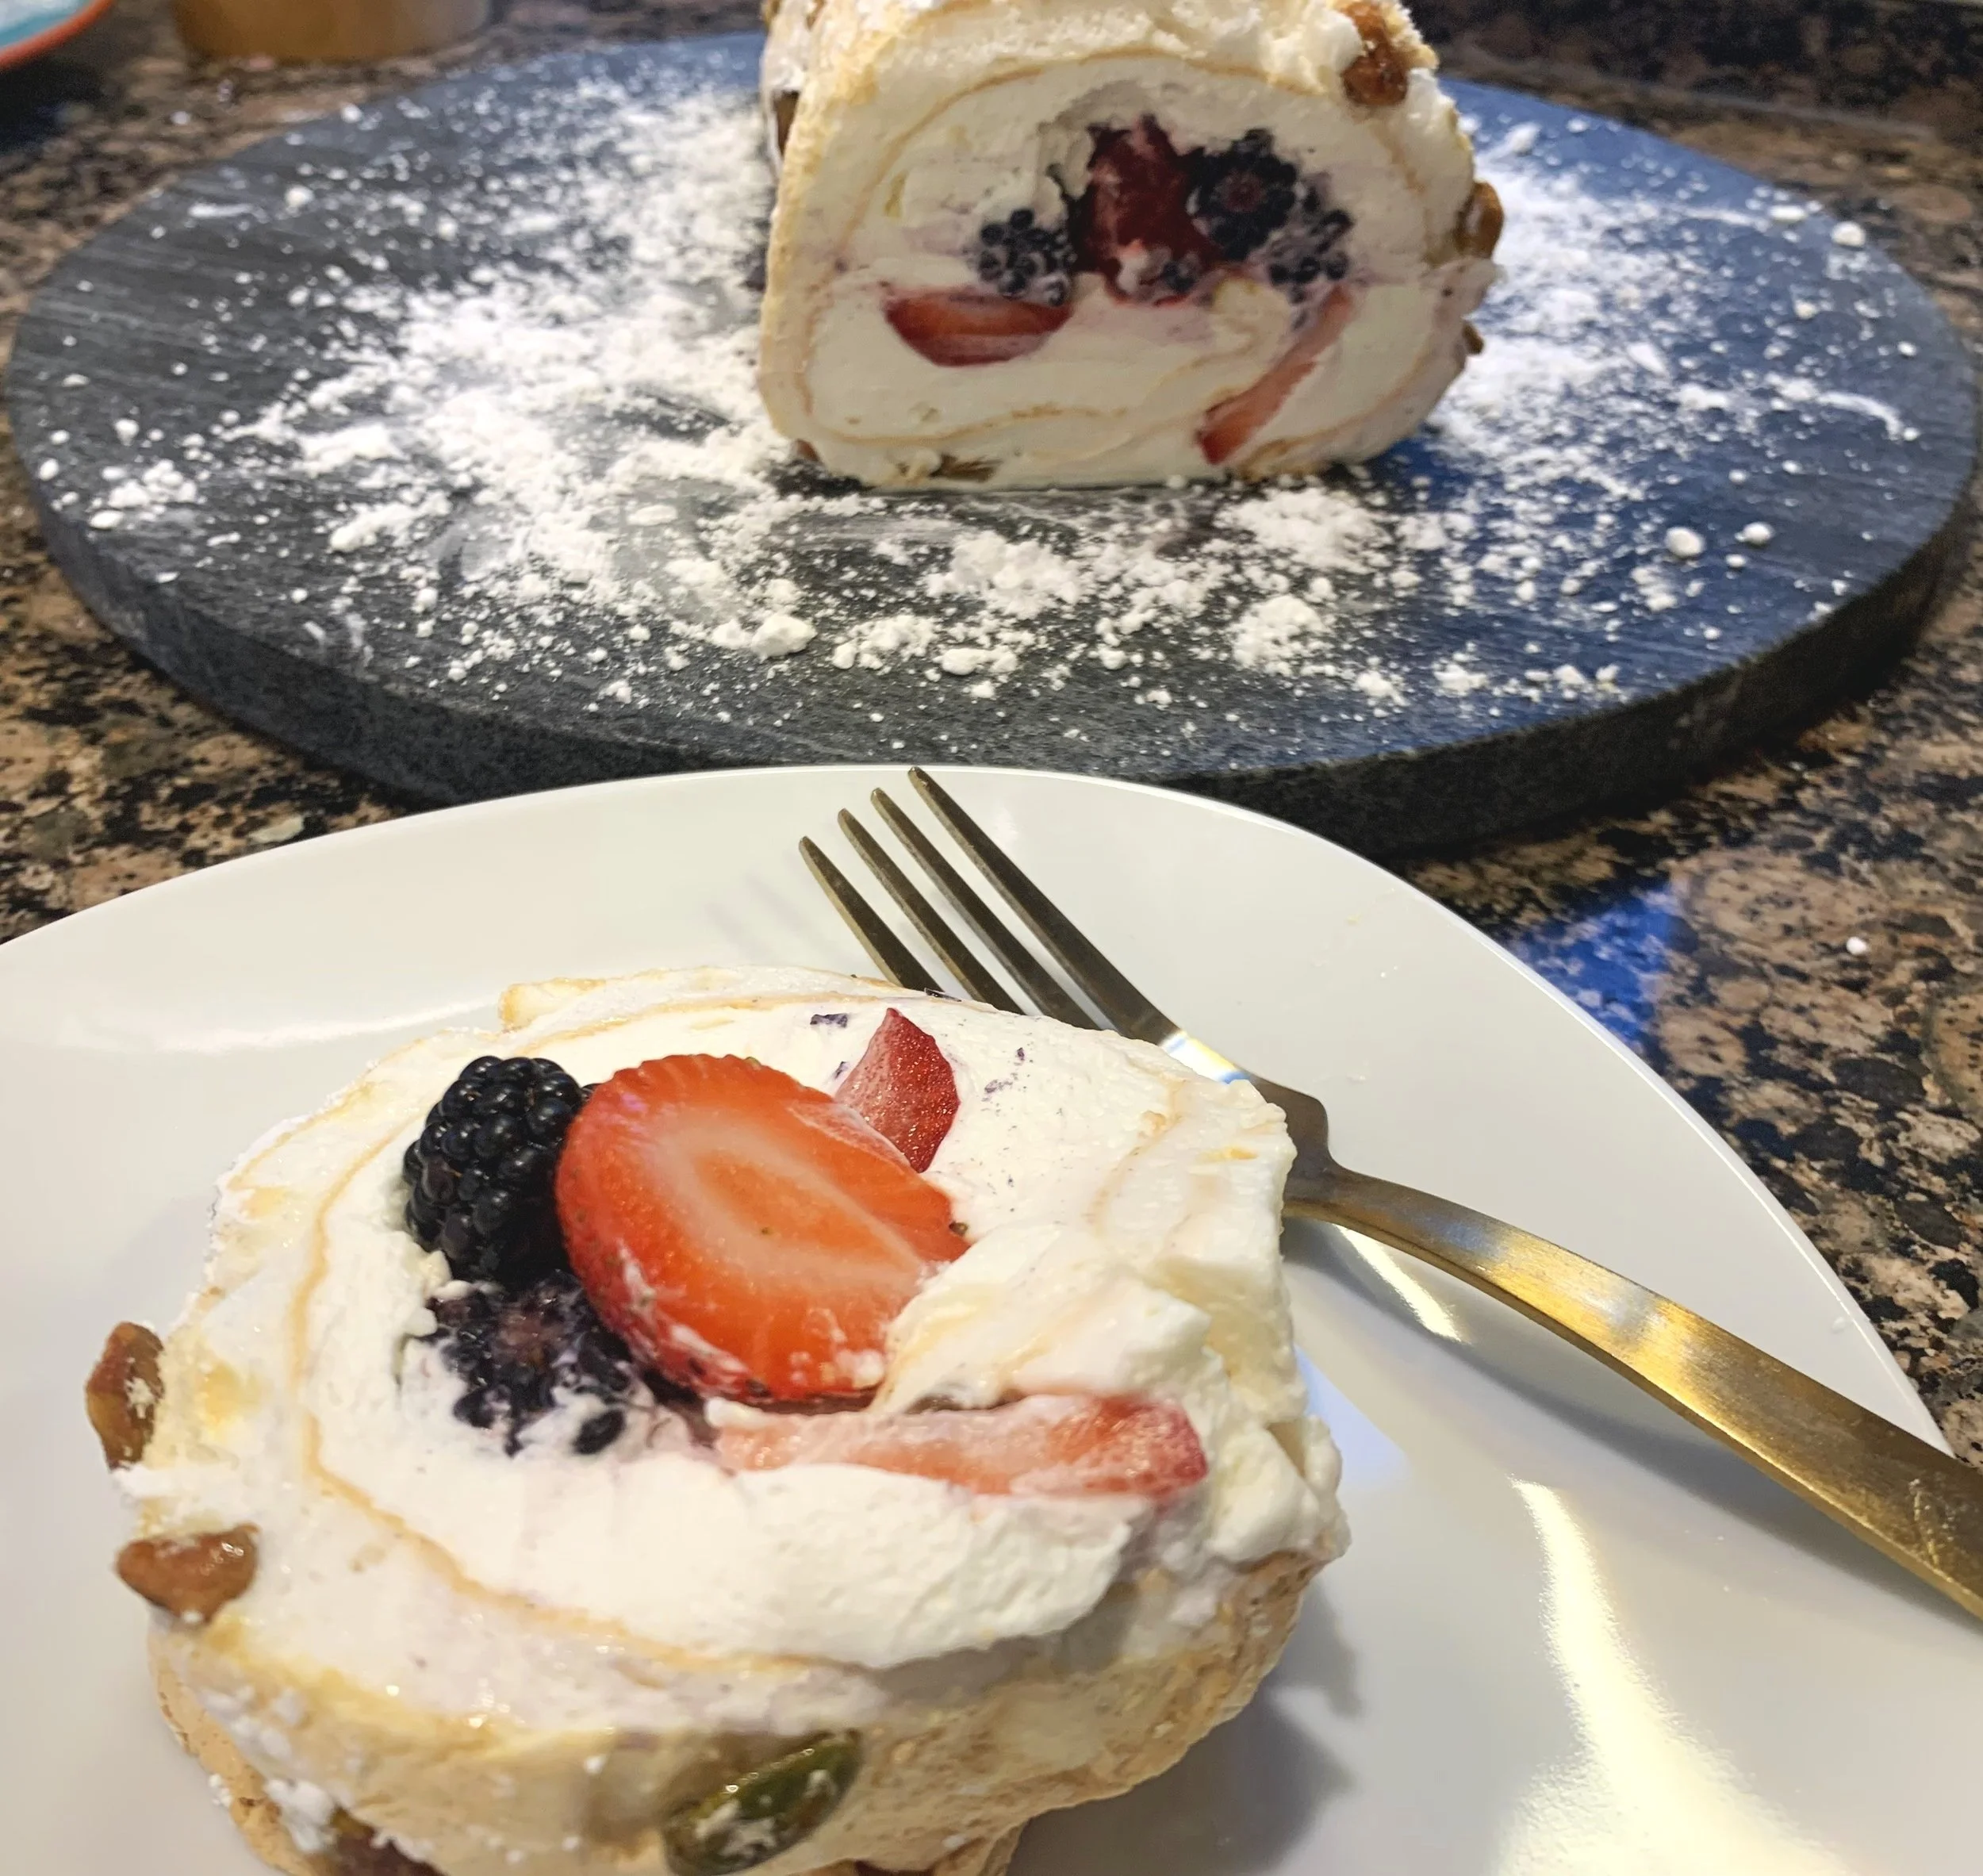
What a delicious combo - sweet, airy meringue, tangy berries and cream, and salty, crunchy nuts! Wonderful tastes rolled up into one!
PERSNICKETY NOTES:
*The term roulade comes from French, meaning “to roll” and is most often used for rolled thinly sliced meats with various fillings, as in the German meat dish “rouladen”. However, the term has come to be used for rolled cakes and pastries as well. What we would usually call a cake roll is called a roulade in England.
*The only drawback to this dessert is that it doesn’t hold up well in the fridge for more than a day. It’s best to prepare it just a few hours ahead of serving and then chilled for no more than a couple of hours then served before the berries begin to weep and make the meringue soggy. But then that may give an incentive to your guests to eat some while the eating’s good!
*When working with egg whites for making meringue or to fold beaten egg whites into other mixtures, let the eggs come to room temperature first. Be sure there are no water droplets in the container where you place your whites and your mixing bowl, and beaters should be clean and completely dried.